The Holy Basil
Tulsi or the Holy Basil is a very important inclusion in almost every Indian household, as it holds great significance in the Hindu traditions. It is regarded as ‘Queen of Herbs’ because of its extremely beneficial potential values as an amazing herb. Its use can be attributed to several of its properties which can make it a potent adaptogen, antibacterial and anti viral agent, antioxidant, immuno modulator, anti depressant and lot more.
Plant Varieties:
There are about three common varieties of this wonderful aromatic plant. They include
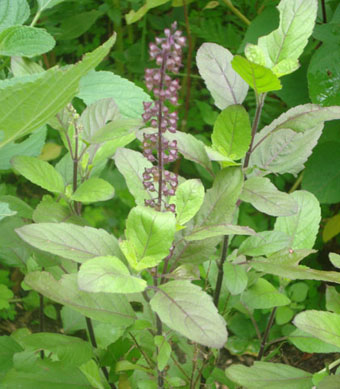
- Krishna Tulsi bearing dark green or purple leaves,
- Rama Tulsi or Sri/ Lakshmi Tulsi which is the most common green slightly toothed leafed variety, and
- Vana Tulsi the wild type of the plant.
Here are some information and few tips about the growth requirements of Ocimum, the holy basil.
Plant In General:
Tulsi is a perennial plant, but generally cultivated as annual sub shrub variety that can grow to a height of 30 to 60 cm. It is a common outdoor plant requiring adequate water and sun light.
Though a slow grower, this nutritional herb plant bears lovely purple flowers during late spring or early summer, when the temperature becomes slightly warm.
Growing the Plant:
Tulsi plant can be grown by sowing the seeds or by directly planting the saplings brought from a nursery.
From the seeds: In order to start growing your own holy basil plant from the seeds, you will need, dry Tulsi seeds, rich potting soil, watering can, a plastic wrap and a container. Here is how to get started.
Step 1: Pick up a container with proper drainage holes and fill it with potting soil having a slight acidic PH.
Step 2: Now sprinkle the dry seeds in the container and cover it with a thin layer of fine soil.
Step 3: Keep the soil moist by watering enough. Care should be taken not to over flow the container with water as the seeds will get washed out.
Step 4: Place the container in an area where it can receive enough sunlight, and then cover it using a transparent glass or a plastic lid in order to prevent the escape of moisture and maintain humid conditions from the seed to germinate. Also leave some space for the air to circulate.
Step 5: Check for the seeds to germinate, which is generally after two weeks. After observing the sprouting seeds, remove the lid, and transplant the seedlings into a different container or directly in your garden soil, once they have grown few leaves and are about 3 to 4 inches long.
A New Home:
Now that your young plant is shifted to a new environment it should be showered with more intense care.
- The new home of your seedling should be rich in nutrients, therefore enrich the soil with liquid fertilizers preferably organic.
- Water it enough, i.e., prevent it from becoming damp or dry.
- The plant cannot thrive in frost, therefore check for proper sunlight and also shade conditions.
- Protect your young plant from pests and also other creatures like snails or slugs.
- In order to get a bushy plant, pinch off the flowering tips.


